Crystal Shrimp

I have been tying with epoxy for a number of years. I had never tied with the instant cure acrylics so I recently purchased a kit of Loon Outdoors instant cure UV acrylic. This stuff is super easy to use and makes great flies.
The Crystal Shrimp is not an original recipe, but I have added a few twists. Enjoy tying, and let me know how it works for you.
Please register to view photographs, ingredients and tying instructions for this killer fly. When you register, you will be put on our newsletter list. I hope you don’t mind, but I think it is a fair trade for these unique fly patterns.
[hidepost=0]
Ingredients:
Size 1 Mustad 34007 or equivalent
Pink or Pearl Krystal Flash
One Grizzly hackle feather
Gray or Mono thread
Instant Cure UV Acrylic. (I used the Loon Outdoors brand. Purchase their kit with the power UV light. Loon’s product is excellent and is much less expensive per ounce than the other brands. You do have to wipe it with alcohol to remove the tack when you are finished tying.)
Instructions:
- Lay a thread base on hook. Wrap back slightly onto the hook bend.
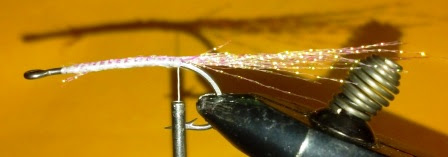
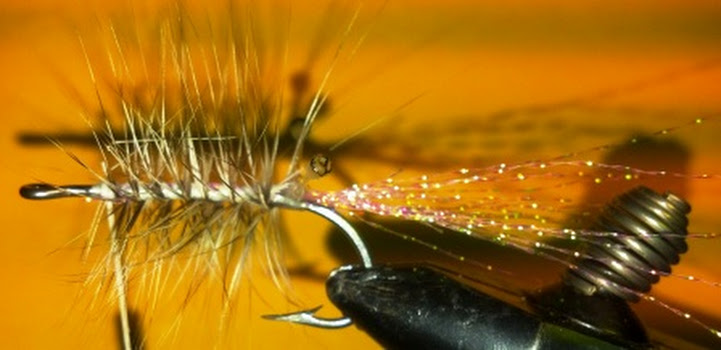
 Take four to five strands of Krystal Flask. Fold it in half and cut. Fold in half and cut again. Tie KF along top of hook shank, extending beyond the hook bend to simulate antenna.
 - Make mono eyes from 40-50 lb mono by burning ends. Tie mono eyes on top of hook shank, directly above the barb, using figure 8 wraps. Bend the eyes up and back. Secure in this position with a dab of acrylic and cure it.

- Tie in the hackle feather. Spiral thread to just behind the hook eye. Palmer the hackle feather forward. Tie off. Cut the barbs of the feather off on the top side of the hook.

- Take about ten strands of KF, fold in half and cut. Place KF so approximately 1” extends beyond hook eye. Tie in place where you tied off the hackle feather. Whip finish. Secure with a dab of thin UV acrylic.

- Color the end of the KF with a permanent marker where it extends over the hook eye to simulate the shrimp tail. Cut off excess KF.
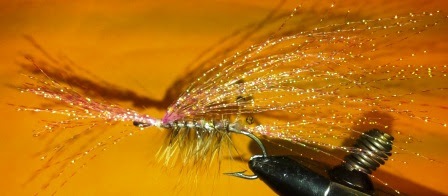
- Run a bead of thick Acrylic along top of hook stopping at the eyes. Spread a small amount of acrylic along the bottom, sides and top of the KF which you just tied on. On the bottom of the KF only spread the acrylic as far as the eyes. On the top of the KF, spread the acrylic approximately ½” farther than the eyes. This will form the horn. Hold acrylic soaked KF along the top of the hook shank, and cure with UV light.

- Cut off material that extends beyond the eyes at an angle to simulate the horn.
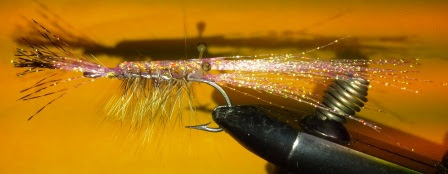
- Take the fly out of the vise and spread a thin layer of thick acrylic along the sides and top of the body of the fly to build up a natural looking shrimp body. Move the fly around to distribute the acrylic evenly along the body of the fly. When it is distributed evenly, cure with UV light.

- Repeat step 8 again if necessary.
- Trim antenna if necessary.
- Color eyes with black marker.
- Go fishing [/hidepost]
 Take four to five strands of Krystal Flask. Fold it in half and cut. Fold in half and cut again. Tie KF along top of hook shank, extending beyond the hook bend to simulate antenna.
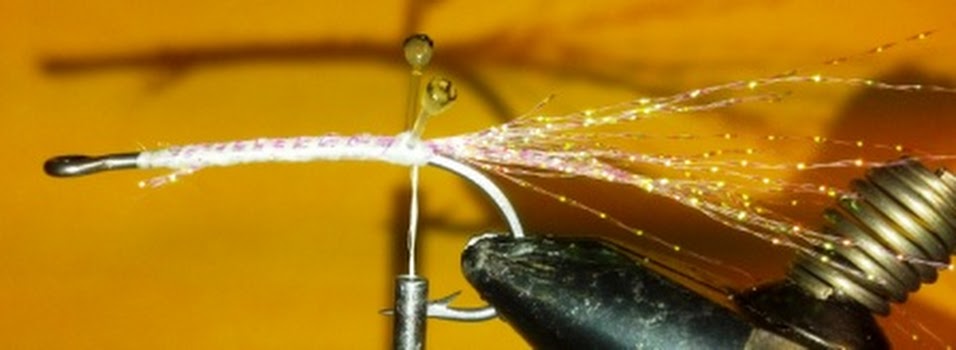

Recent Comments